Introduction
The observer pattern is a software design pattern that allows an object, usually called the subject, to maintain a list of dependents, called observers, and notify them automatically of any state-changes.
Many languages have this pattern either built-in or in their standard libraries.
Examples:
- C# has the concept of Observable in the standard .NET library. Also it has the concept of delegates.
- Although Dart doesn’t have that, in Flutter there is the SetState method which automatically notifies any observer. It is mainly used to refresh the UI.
Rust however, does not have this pattern built-in, it took some time to implement it, as we will see.
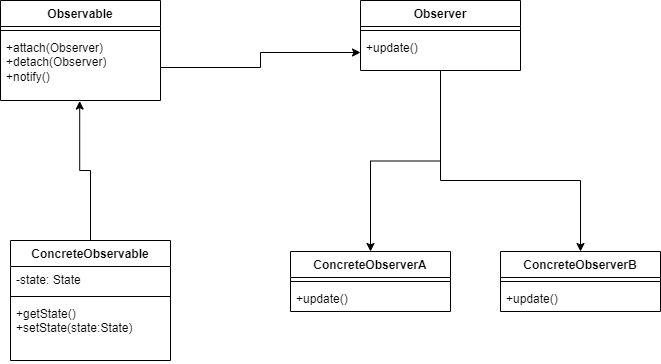
So, what does it look like?

A short breakdown of this diagram:
- First there is the Observable, this could be an interface, the object which is to be observed. The observable holds a list of observers.
- The Observer which sends out a message to the observers. This could also be an interface.
- The ConcreteObservable, the concrete class which holds the state. If anything changes in the state, the setState method is called, which in turn calls the notify method. That in turn notifies the observers.
- The concrete observers which handle the state change.
In this much simplified example, the notify and update methods have no parameters but you could of course send extra data to the observers.
Implementation in Rust
Open your terminal in an empty directory and type:
cargo new rust_observer
cd rust_observer
Now open main.rs in your favourite IDE. We will start with Observer trait:
trait Observer {
    fn update(&self,data:&str);
}
This seems quite straightforward. The trait has just one method, update, which has some data as a parameter.
Now implement the Subject:
struct Subject<'a> {
    observers: Vec<&'a dyn Observer>,
    state: String,
}

impl<'a> Subject<'a> {
    fn new(state: String) -> Self {
        Self {
            observers: Vec::new(),
            state: state,
        }
    }

    fn attach(&mut self, observer: &'a dyn Observer) {
        self.observers.push(observer);
    }

    fn detach(&mut self, observer: &dyn Observer) {
        self.observers.retain(|o| !std::ptr::eq(*o, observer));
    }


    fn notify(&self) {
        for o in &self.observers {
            o.update(&self.state);
        }
    }

    fn set_state(&mut self, state: String) {
        self.state = state;
        self.notify();
    }
}
This deserves a bit more explanation
- In the Subject struct, the observers must have the same lifetime as the whole struct, hence the lifetime-specifier.
- The implementation of the Subject has the same lifetime specifiers.
- The new method, i.e. the constructor, is quite straightforward.
- The same goes for the attach method, one possible enhancement could be to test if the observer is already contained in the observers vector, I leave that as an excercise for the reader.
- The detach method uses the retain method. This method was quite new to me. What it does is basically filter using the specified closure. Every element for which the closure returns true, is retained in the vector, when it returns false the elements is removed.
- The notify method iterates over every observer, and calls the update method on each observer.
- The set_state method changes the state, and calls notify, so that every observer can react to the state change.
Now let us build a real observer:
struct ConcreteObserver {
    name: String,
}


impl Observer for ConcreteObserver {
    fn update(&self,data:&str) {
        println!("{} received data: {}",self.name,data);
    }
}
This quite simple, the update method gets called with the new data, and handles it. In this case it just prints it out.
Time to test:
fn main() {
    let mut subject = Subject::new("initial data".to_string());

    let observer1=ConcreteObserver {
        name: "Observer 1".to_string(),
    };

    let observer2=ConcreteObserver {
        name: "Observer 2".to_string(),
    };


    subject.attach(&observer1);
    subject.attach(&observer2);


    subject.set_state("updated_data".to_string());

    subject.detach(&observer2);

    subject.set_state("Again updated data".to_string());

    subject.detach(&observer1);
}
Line by line:
- We instantiate the Subject with some initial data.
- Then we define two observers, both of which are ConcreteObservers. Each one gets a different name, which will make it easier to distinguish between them in this setting.
- Then we need to attach those to the subject, which happens in the next two lines.
- The real test, the set_state method is called. This sends the state-change to the two observers and should print that out
- To make sure our detach method functions correctly, we detach the second observer.
- And we do another state change, we should now only get one print statement.
- To be complete, we detach the first observer as well.
You should get output along these lines:
Observer 1 received data: updated_data
Observer 2 received data: updated_data
Observer 1 received data: Again updated data
Possible enhancements
One possible enhancement would be to make this threadsafe, as this implementation isn’t threadsafe. I will come back to that in the near future.
Conclusion
A few weeks ago I implemented this pattern in Go, however, Rust gave me a bit more headaches. This has little to do with Rust’s sometimes quirky nature, but more with my inexperience with Rust. On the other hand, implementing this pattern taught me a lot about Rust. I found lifetimes a very powerful yet confusing concept, especially for beginners.


